

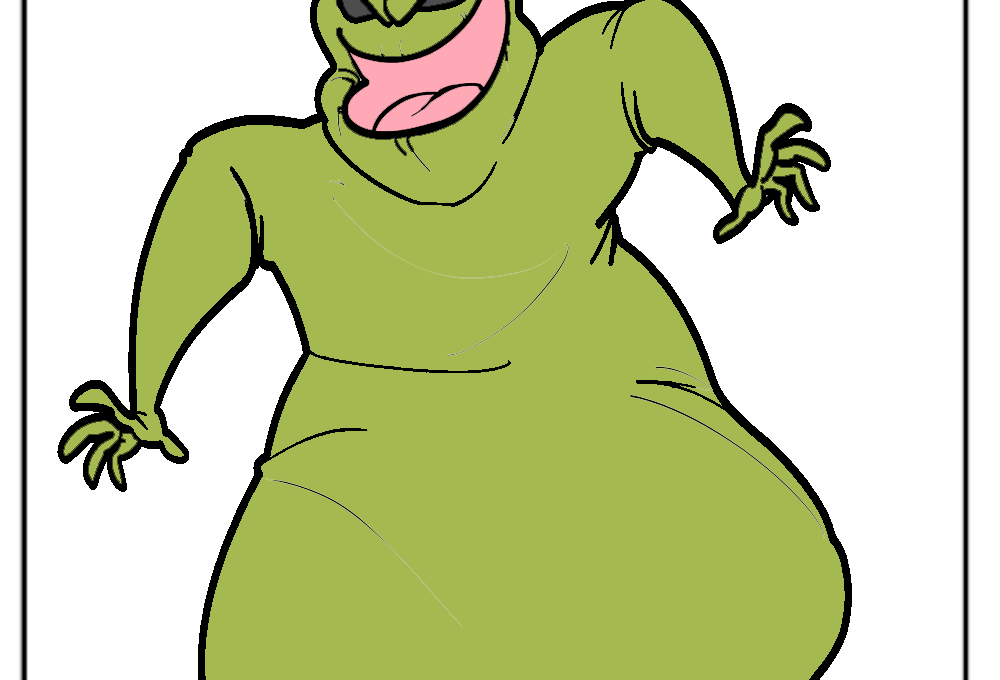

Oogie Boogie
The film The Terrible dream Before Christmas is overflowing with various odd and glorious characters, and a huge piece of them have to some degree, a faint and stunning go to them. Potentially the most wretched individual in the film similarly is its chief lowlife: the boogeyman himself, Oogie Boogie!
Visit the Elsa Coloring pages.
These vile individuals spur fear throughout the land, and he has an unprecedented appearance and character to match his standing. Despite his contorted look, it is generally agreeable to sort out some way to draw in Oogie Boogie, thanks to his uncommon appearance.

This should be a horseplay guide if you love the film or the individual!
Stage 1 – Oogie Boogie Drawing
In the film, this character is depicted as made of burlap material, and this is significant at the highest point of the need list as we start this helper on the most capable strategy to draw Oogie Boogie.
For the present, we will start with his head, and even more unequivocally, we will start with his eyes. To draw his eyes, we will draw two changed shapes with sharp sides to make him generally look very mean!
Then, we will draw his head outline. The sides of his head are drawn for specific smooth and possibly changed lines, and the most elevated place of his head is a thin point fumbling aside. This unstable point will similarly have a line on it with a couple of additional humble lines to cause it to appear like he is closed up.
Finally, we will draw his open, smiling mouth. To draw his mouth outline, we will use lots of nothing. Changed lines partner with one another to make the shape as it appears in the reference picture. You can finish this step for specific more lines underneath his head for the start of his neck, and a while later, we can forge ahead!
Stage 2 – Next, draw the principal arm and start his body
Since you have his head drawn, we can now start the body of your Oogie Boogie drawing. Use a couple of long, twisted, at this point, smooth lines for his arm on the right. It will be exceptionally extensive and bowed a piece at the base, with another extended sewed line along it.
Then you can start to draw his body. Characterize a long limit down from the pit of his arm, and a while later, twist it into a point at the base of his foot. Whenever you have drawn these parts, add more detail to his arm to make it look more creased, and a short time later, you’ll be ready for stage 3!
Stage 3 – Draw his other arm and the underpinning of his body.
One of the properties of this character is that he loves to wager, and we will address that in this step of our assistant on the most capable technique to draw Oogie Boogie! Characterize a couple of extra twisted limits to make his thick arm on the right turn up.
Then, at that point, you can draw a couple of little touched blocks onto his hand for specific dice, and that is the very thing that we inferred by tending to the wagering subject. This arm will similarly have some serious sewing coming; you can draw it as you have drawn the sewing ahead of time.
Then, expand a couple of hardly twisted lines from the most elevated place of his leg for the groundwork of his body.
Stage 4 – As of now, finish the plan for Oogie Boogie
This step of your Oogie Boogie drawing will see you wrapping up the plan for his body. Essentially widen a line down from his arm on the right, and bring it down until it twisted into a changed point. It will connect with the groundwork of his body as it appears in our reference picture.
Then, we will add many wavy, twisted lines inside his body to make it look like he is made of flappy material. When these points are drawn, it’s on to a couple of last nuances in the resulting stage!
Stage 5 – Finish your Oogie Boogie drawing
The last nuance that we will remember this step of our assistant for the most capable technique to draw Oogie Boogie will be extremely direct, yet there will also be a chance to add your contacts! To finish our nuances, add one more lengthy join to the right-hand side of his body. Then, at that point, you are ready for the last step!
Before you proceed to that last step, this is your chance to add your contacts to the picture. You could draw in an establishment to parade your #1 scene from the film or even draw a couple of extra characters from it that you love.
You could add his three hooligans! These are a couple of contemplations, but what else could you consider to finish this drawing?
Stage 6 – Finish your Oogie Boogie drawing with some tone.
For the last piece of your Oogie Boogie drawing, you can clean him off with some tone. He is expected to be made of burlap-like material, so we included a beige tone for his body with some purple for the dice he holds.
We chose these for film accuracy, yet you could similarly change up the assortments expecting you wish!
Also Read Voot kikx

